Tuesday, December 6, 2011

Fluffs (Chocolate Covered Homemade Marshmallows)


In the fall of 1999, I was employed for a short time at Mrs. Cavanaugh's Chocolates store before I was fired for insubordination (ironically, not for eating approximately 1.5 lbs. of chocolate a night along with my coworker). It was a highly destinal (this is a word I just invented-you are free to use it) employment, causing me to become severely addicted to gourmet chocolate-which happens to be quite costly, and not at all figure-flattering.
Of the highly delicious chocolates to be had, one of my favorites was the Chocolate Fluff, or a double-dipped version- a Flip. The marshmallow inside was nothing like the marshmallows from the grocery store-it was fluffy, creamy, and moist.
I've always wanted to try homemade marshmallows, but I once read a recipe review where the cook said mixing the marshmallow cream caused to mixer to burn out-so I've been a little nervous. Most recipes call for beating the mixture for 20+ minutes, but the cinchy recipe I found has you mix for only 5, and it turned out great. Since the recipe sounds complicated by just reading it, and some of you may not have worked with gelatin before, I thought I would post some photos along with the instructions. It really is easy and uncomplicated-and the marshmallows really are 100 times better!


Fluffs
Serves 20-40, depending on the size you cut
Source: adapted from Baked-New Frontiers in Baking


2 1/2 teaspoons powdered gelatin (a little less than 2 packets)
2 cups sugar
1 cup light corn syrup, divided
2 tsp. vanilla extract (I was worried the vanilla would discolor the marshmallows, but it doesn't.)
1/8 tsp. salt
1/2 cup powdered sugar, plus more for dusting


1 lb. chocolate-milk, semi-sweet, or dark (I don't think chocolate chips would work as well in this recipe as baking chocolate-the added wax would make a more crunchy bite)


Optional toppings: toasted coconut, crushed candy cane, chopped nuts, coarse salt


Directions:
Grease a 9x13 inch pan with vegetable shortening. In a small glass or metal bowl, pour 1/2 cup water, and sprinkle with the gelatin. Let the gelatin soften 10 minutes.


In a mixing bowl, pour in 1/2 cup of the corn syrup.


On your stovetop, set up two saucepans. In a small saucepan, fill half way with water, and heat over medium low heat. You want to get the water hot, but not boiling. In a medium saucepan, gently stir together the sugar, 1/2 cup of the corn syrup, and 1/2 cup of water. Put the the saucepan over medium-high heat and clip a candy thermometer to the side. You 'll heat this to soft-ball stage, 235-240 degrees. It will take a while-around 10 or 15 minutes. You don't need to stir it.


After your gelatin has softened for 10 minutes, place the bowl over/inside of the pan of hot water. Stir with a spatula as the gelatin melts to a smooth consistency.


 When the gelatin is smooth, pour it into the mixing bowl with the corn syrup. Turn on the mixer to a low speed, and keep it going while you wait for your sugar mixture to reach soft ball stage.


When your sugar mixture reaches 235-240 degrees, remove from the heat and take out your candy thermometer. Turn the mixer up to to medium speed for one minute, then slowly pour the hot sugar into the bowl. When all of the sugar mixture has been added, turn the mixer up to medium-high and beat for about 5 minutes. (I started mine out at a 5 speed in my kitchenaid, and I probably should have set it on speed 7-mine took a couple minutes longer than 5) The marshmallow mixture will turn white and fluffy. Add the vanilla and salt and turn the mixer up to its highest setting for another minute.
The mixture will turn from this.....
To this.


Working quickly, pour the marshmallow into the prepared pan. Sprinkle with powdered sugar and let sit for 6 hours, or overnight.


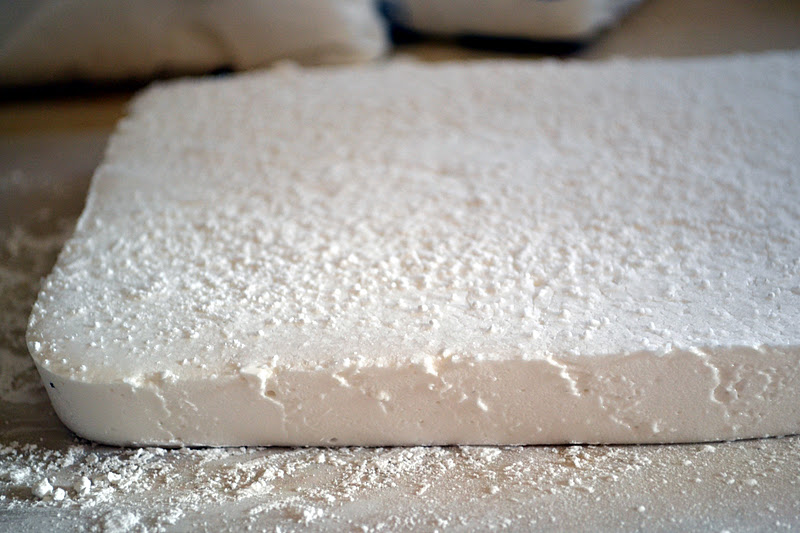
After setting up overnight.


Another situation I discovered this morning: the kids had  begged and begged to have a "camp out" in our  extremely unpleasant basement-I had given it 2 hours, tops, but they slept the entire night like this.
Use a knife to loosen the marshmallow from the edges of the pan, and use your hands to pull the marshmallow (it will come out in one giant piece) out of the pan and onto a flat surface lightly dusted with powdered sugar.


Cut the marshmallows into desired sizes. If you just want some delicious plain marshmallows for hot chocolate or snacking, you'll want to roll the cut squares in some powdered sugar. They keep for a week in an air-tight container.
Owen made smaller squares, since he likes to cut things.


To coat in chocolate:
Prepare your toppings, if using.
Lay sheets of waxed paper over two baking sheets.
Chop the chocolate into chunks and heat on the stovetop over medium-low heat until melted and smooth. Remove from heat and let cool slightly.You will notice my fluffs are not a picture of beauty. They are a little lumpy, and this is due to the fact I don't know what I'm doing. But here's what I did: Drop the marshmallows one at a time into the pan; use a spatula to cover the marshmallow in chocolate; lift the marshmallow out with a couple of forks, and place on the baking sheet. Immediately sprinkle with toppings. They will take a few hours to set up, depending on the temperature of your room.
Toasted coconut topping

Saturday, November 19, 2011

Sweet Potato Meringue Pie


I made this pie for the first time last year, when I saw it posted on one of my very favorite food blogs abountifulkitchen.com. Josh and the children detest sweet potatoes, due to the fact they are abnormal people-and will not touch this pie. Therefore, I take it upon myself to eat it all-and luckily, sweet potatoes are extremely healthful. If you and your family happen to be normal people, you will really enjoy this mix of flavors-it's a great alternative to pumpkin pie if you're looking for something a little different.


Sweet Potato Meringue Pie


CRUST
1 cup (4 ounces) pecan halves
9 whole graham crackers, broken
4 teaspoons minced fresh ginger (I used only 2 tsp. because I'm not a huge fan of ginger)
2 tablespoons dark brown sugar
1/2 teaspoon kosher salt
1/2 teaspoon ground cinnamon
6 tablespoons unsalted butter, melted


FILLING AND TOPPING
Four 8-ounce sweet potatoes
1/2 cup dark brown sugar
3 large eggs
1/2 cup heavy cream
1 cup granulated sugar
1/3 cup water
3 large egg whites
Pinch of salt
1 teaspoon pure vanilla extract


MAKE THE CRUST
Preheat the oven to 325°. In a pie plate, toast the pecans for about 10 minutes, until fragrant and browned. Let the nuts cool completely.
In a food processor, combine the pecans, graham crackers, ginger, brown sugar, salt and cinnamon; pulse until crumbs form. Add the butter and process until incorporated. Press the crumbs evenly into a 9 or 10-inch pie plate. Bake the crust for about 25 minutes, until lightly browned and fragrant. Using a rubber spatula, press down the crust and let cool completely. Wipe out the processor.


FILLING AND TOPPING
Place potatoes in pot cover with water. Boil sweet potatoes until soft, about 30-40 minutes. Peel and let cool. You should have about 2 1/4 cups.
Transfer the sweet potato to the food processor and puree until smooth. Add the brown sugar and eggs; process until blended. Add the heavy cream and process again, just until incorporated. Pour the filling into the crust and bake for about 50 minutes, until set and the top looks dry; cover the crust edges with foil if they darken. Let the pie cool completely. Preheat the broiler.
In a small saucepan, combine the granulated sugar and water and bring to a boil. Cook over high heat without stirring until a candy thermometer inserted in the syrup registers 240°, about 5 minutes. Meanwhile, in the bowl of a standing mixer fitted with the whisk, beat the egg whites with the salt until soft peaks form. With the machine on, carefully drizzle in the hot syrup and beat at high speed until the whites are stiff, glossy and warm to the touch, about 5 minutes. Beat in the vanilla.
Mound the meringue over the sweet potato filling, swirling it decoratively. Broil the pie 4 to 6 inches from the heat for about 30 seconds, until the meringue is lightly browned. Cut the pie into wedges and serve.


If you're in need of some ideas for Thanksgiving dishes, here are some links to the recipes my family and I will be making this year (*all photos are from the original blog/website):

Kate's Turkey from Our Best Bites blog


Emeril's Boston Bibb Salad with Roasted Squash, Pecans, Bleu Cheese and Warm Bacon Vinaigrette
I will tell you- this photo is a little strange, and does no justice to the deliciousness of this salad-I crave it all year long!


Ruth's Chris Sweet Potato Casserole


The Pioneer Woman's Mashed Potatoes


Emeril's Chocolate Cream Pie


Honey-Pecan Pumpkin Pie  from epicurious


The Pioneer Woman's Pecan Pie

Happy Thanksgiving to you, Friends-and in the wise words of Paula Deen, "Let's gain some WEIGHT this weekend!"


Some Recent Exciting Developments in the Hansen Household

If you have known myself or my children (and by "children" I am here referring to Owen and Carson) for more than 5 minutes, you would assume we have had some "concerns" about the gender of our baby due in May. Strangely, Josh did not feel spending $75 on a visit to Fetal Fotos for an early elective gender scan was worthy of a household expense. So, with the help of my friend Jill (who took my payments, preventing me from spending the money at the gas station) I very painstakingly saved up $50 over several months for the slightly-ghetto Fetal Studio in the mall-where a Lithuanian obstetrician now serving as a Utah-mall-ultrasound tech gave us the news:

IT'S A GIRL!!! 

I will tell you I have never been more happy to *not* see something in my life.

We celebrated that night with dinner out to the Olive Garden (which Owen likes, since "dey bwing you a wahwet (wallet) wif candy inside") and a pink balloon party for the kids-where they showed far more excitement for the balloons than they did over the fact they are having a baby sister.
You may find it strange that Dylan is wearing a tiny night shirt, while Owen is still wearing his coat. This is simply evidence of how quickly Dylan feels the need to change her clothes the moment upon entering the house.

And in other exciting news: My Hot Sister and her Hot Boyfriend are getting married next month!
For those of you who, like me are: a.) a voyeur and b.) a giant fan of all things "wedding", here are a few of my favorites of their engagement photos:


Wednesday, November 2, 2011

Apple Pie with Walnut Streusel


It's officially The Holiday Season, friends. A time when I can publicly indulge and pretend I'm not that big of a pig all year round. It is also the season for pies, and this is my most favorite apple pie. I found the recipe during our first year of marriage-when I was a beginning foodie and would spend my time at work (a secretary for my dad's office) reading recipes on the internet, and have since made it every year.


Apple Pie with Walnut Streusel
Serves 8 generously


9 inch pie crust, storebought or this Martha Stewart recipe is what I use


For the topping:
4 Tbl. butter, softened
4 Tbl. firmly packed brown sugar
4 Tbl. all-purpose flour
1/2 cup chopped walnuts


For the filling:
3 pounds (about 6 medium) apples (I like Granny Smith)
1/2 cup firmly packed brown sugar
1/4 cup granulated sugar
2 Tbl. flour
1 Tbl. lemon juice
3/4 tsp. cinnamon


Prepare the pie crust and lay it in your pie plate. 
For the topping:
In a small bowl with your fingertips blend the butter, brown sugar, and flour until smooth and blend in  the nuts. Chill topping in the refrigerator until ready to use.


For the filling:
Peel and core apples. Cut apples into 1/2 inch wedges and in a bowl toss with remaining ingredients to coat.


To assemble and bake:
Preheat oven to 350 degrees.
Spoon filling into shell (don't put the streusel on yet!) and bake for 1 hour and remove from oven. Crumble topping evenly over pie, and bake an additional 30 minutes. (Do not at this time leave your house to deliver children to playdates and gymnastics class. My pie is a little more browned than usual for this reason.)


Serve with whipped cream or ice cream.


As readers of my blog, I'm afraid you are obligated to view pictures of my children in their halloween costumes:
Dorothy


Dorothy after having a bit of a skip through the poppies

                                                                                 
Batman


How 'bout like this, mom?


Robin the Sidekick

If you would like to criticize the quality of the mask-drawing, I invite you to come give it a try on this boy.


As hard as I tried to get a good "buddy" picture...

Unfortunately, there was a dead bird in the bush. And as all mothers of boy's know: there is no competing with a dead bird.


Tuesday, October 25, 2011

Navajo Tacos


Football season is upon us, friends. And that means the children and I are subjected to Josh's sports radio morning and night. It also means: delicious food. The first time I had a Navajo taco was at a football game-shamefully, the Utes no longer have these available. I can attest they do have: philly cheesesteaks, hot chocolate, roasted cinnamon almonds, and brownies available. I am a rather high-maintenance football guest, but I am perfectly willing to participate in the rounds of high-fives, making me a super fun guest as well. (Even though I may have been thinking that doing rounds of high-fives is pretty much the equivalent of girls turning to each other and screaming and clapping. I'm pretty sure Josh would not be willing to participate in such an activity.)
I've been making this fry bread recipe for years, and it's super easy. And the leftovers can be served for dessert with powdered sugar and honey butter! (In which case I would like to note for my sister who becomes enraged over this topic: they would be called "scones")


Navajo Tacos
Makes 6


2 cups flour
1 Tablespoon baking powder
1/2 tsp. salt
1/4 cup evaporated milk
About 3/4 cup water


Mix the dry ingredients to combine. Stir in the evaporated milk, then add water until the dough comes together without being too dry. (I used the entire 3/4 cup)
Knead until elastic and divide into six parts. Pat into circles a 1/4 inch thick.
Fry in oil heated to 365 degrees, until golden brown on each side. It only takes a couple minutes.
Top fry bread with you choice of toppings such as:


refried beans (I used 1 can for all six tacos)
salsa
shredded cheese
avocado
lettuce
sour cream
chopped tomatoes
chopped white/green onions

Friday, October 21, 2011

It's Official!

It's official, friends....
The person responsible for leaving these chewed globs of a mysterious substance on the bedroom floor:
Later found to be chocolate rice crispy candy-thankfully not poop as first assumed.


Who then removed one shoe and put himself to nap in his brother's bed:
Is going to be The Big Brother sometime around May 1st!

Wednesday, October 19, 2011

Chocolate Sugar Cookies


I have had the goal now for the past few nights, to: put the kids to bed at 8, exercise, do some clean up around the house, and write the blog post for these yummy cookies. In reality, I: got the kids to bed at 9, and immediately proceeded to pass out on the couch.
The kids and I made these (and by "the kids and I" I mean: they were permitted to do the sprinkles) over the weekend to celebrate the fact that The Children's Sports are Over for the Fall Season.


There will be no more running around the house at 5 pm yelling about Dylan's missing soccer sock; no more worrying Owen will fall asleep in the van during the 15 minute drive to tee-ball, causing him to wake up as Satan Himself; no more attempting to watch (and by "watch" I mean: encourage Owen to not eat the grass) Owen's tee-ball game while at the same time keeping Carson from the parking lot, and monitoring the items Dylan is bringing to the playground nearby (such as "hot dog and marshmallow roasters").
You may be asking yourselves, "I wonder why she continues to sign up these children for sports, when clearly Dylan is the only one remotely enjoying herself?" And the reason is this:


I have a dream that someday Owen will listen to me when I tell him he actually loves tee-ball, and that my kids will have great friends like these through their awkward teenage years.


In regards to these cookies: I got the recipe from Our Best Bites, an AWESOME blog for family food, and the thing I really liked about them was the texture-I thought it was weird the recipe didn't include any leavening, but the cookies held their shape perfectly (check out the Darth Vader shapes from Best Bites!), and were super moist and soft.


Chocolate Sugar Cookies
Makes 2 dozen (mine were pretty large, so I got 15 cookies)


2 & 1/2 c. all-purpose flour
1/2 c. cocoa powder
1 cup (2 sticks)  butter
1 c. sugar
1 egg
1 tsp. vanilla


Preheat oven to 350. Line baking sheets with parchment or a silicone baking mat if you have either of those.
Cream together the butter and sugar until light an fluffy (1-2 full minutes). Beat in the egg and vanilla until well combined.
Whisk flour and cocoa powder together and then slowly add to the butter mixture by spoonfuls with mixer at low speed. Scrape down sides and bottom of bowl as needed.
Lightly dust rolling surface with coco powder or flour or a mixture of both.  (I use cocoa powder).  Roll dough about 1/4 inch thick.  It helps to roll soft dough in between sheets of plastic wrap or parchment and then place them in the fridge for about 15 minutes (or the freezer for 5-10) until firm.
Cut out shapes and place on baking sheets.  Bake for 8-10 minutes, until set.  Sometimes it’s hard to tell with chocolate cookies when they are done, so just watch for the dough to not look “wet” anymore and the edges should be holding their shape nicely.
Let cookies cool for 2-3 minutes and then use a spatula to place them on a cooling rack.


A few highlights of the season for Grandma:


Dylan is a very attentive goalie-unless, of course, she is busy playing in the net.


Hit!

Trying not to look too proud on 1st base